BLT Pasta Salad

Bacon, Lettuce, Tomato, Pasta and wait… Pasta? Yes, Pasta! Meet your new Barbecue, Potluck, family favorite: BLT Pasta salad.

BLT pasta salad

I know what you’re thinking: “Why mess with a classic?” Well, its simple really. See salad is wonderful all on its own. Especially one with homemade ranch dressing. Now, BLT sandwiches have a special place in our hearts too. So we figured; why not have the best of both dishes in one!


Did we mention this dish is a cinch to make. You can use any small pasta you like. You can use any ranch dressing you enjoy- although we prefer our house made ranch. You can even substitute the cilantro for parsley. What you can’t do is have just one bite. Seriously, its that good. You will want more. Lots more…


Before you can eat, you’ve got to cook. It all starts with cooking your pasta, then rinsing in cool water. Drizzle a little olive oil over the pasta to keep it from sticking. Then, while your pasta is still cooling, cook your bacon till crispy. Keep the rendered fat. Split your cherry tomatoes in half and put in a bowl with your pasta.

BLT Pasta

Now shred some lettuce and finely chop your cilantro. Add these ingredients with the bacon to your pot.

BLT Pasta 2

Already looking good! Now, take your ranch dressing and drizzle over the pasta. Stir to make sure you’ve added enough to lightly coat the pasta. Fold in the mayonnaise to bind the ranch to the pasta. Now chill the pasta for a minimum of 30 minutes. Then enjoy!

BLT Pasta 3

Ingredients: 

2 C. Small Elbow Macaroni

1 Pint Cherry Tomatoes

2 C. Iceberg Lettuce

10 Slices Crumbled Bacon

1/4 C. Ranch Dressing

2 Tbls. Mayonnaise 

3 Tbls. Cilantro 


Cold Cucumber Soup

Summer is here and so comes the time where the idea of running the oven is a nightmare. Crisp cold salads are wonderful but what about soup? Enter: Cucumber Soup. Cold english cucumbers to be exact. This soup has wonderful depth and flavor. On a hot summer day: Cold Cucumber Soup hits the spot!

Cucumber soup 1

Ingredients

2 large English cucumbers. Half roughly chopped, Half finely diced

1 1/2 C. Plain or Honey (If you prefer sweetness) Greek Yogurt

3 Tbsp. Lemon Juice

1 small shallot finely diced

1 garlic glove finely diced

2 Tbsp. Fresh or 1 Tbsp. Dried Tarragon

1/3 C. Fresh Dill or 2Tbsp. Dried Dill

1/4 C. Olive Oil, plus more for topping

1/2 finely diced red onion

Cucumber Soup

Directions:

In a blender combine all of the ingredients except the finely diced cucumber and onion. Puree till smooth. Taste, then add a bit of salt and pepper. Place in airtight container and chill for at least 4 hours or up to 8 hours.

Garnish with finely diced cucumber and finely diced red onion. Drizzle olive oil on top and serve!

Cold Cucumber Soup


Sweet and Savory Tarts

Tarts! You can have them sweet, savory, salty, buttery, the list goes on and on… Today, I give to you: the tale of two tarts! Our first tart is sweet and tangy. Fresh blueberries meet up with lemon cheese filling for a delicious treat!  Pair this tart with your morning coffee or a scoop of vanilla ice cream for a sweet treat.

(Makes 4 generous tarts)

Ingredients: 

1 pre-made pie crust

1 C. fresh blueberries

1 C. Softened cream cheese

2 Tbsp Lemon curd

1 Tbsp Powdered sugar

Blueberry tart

Directions: 

Preheat your oven to 400 degrees. In a small bowl mix together the cream cheese, lemon curd and powder sugar.  Roll out your pie crust into a a rectangle. Then begin cutting out smaller rectangles to the size of 4″ x 5″. Place a small dollop of the cheese mixture to the center of the small rectangle. Spread the mixture to 1/4″ of all the sides. Now add the blueberries to each tart. Gently fold the edges in on the pie crust to provide a “crust”. Bake until golden brown. Place on wire rack to cool. Then enjoy till your hearts content!!!

Savory tart

Now for the savory tart! Follow the same directions for the pie crust shaping of the tarts. Your toppings can be as varied as your like. Here we used asparagus, artichoke hearts, ground turkey, brie and Parmesan. Simply layer your toppings. Bake on a sheet pan until golden brown. Then enjoy!!!

Jalapeno Shrimp Poppers

It’s almost game day! As everyone prepares for their homes filled with guests, the big question becomes: What’s easy, fun and something everyone will love to eat? The Answer is: Jalapeno shrimp poppers! These have just enough heat, packed with flavor and a crowd favorite. You can even do some of the work ahead of time. Freeing you up to enjoy fun, friends and the game.

Shrimp & cheese jalapenos

(Makes 24 poppers)

Ingredients: 

24 medium jalapenos

1 lb. peeled and deviened shrimp

1 C. Cream cheese

1/2 C. Parmesan cheese

1 Tbsp Cumin 

1 Tbsp Smokey Paprika 

1 Tbsp Onion Powder 


Directions: 

(Up to one day before you can do the following)

Roast the Jalapenos until the skin just begins to glisten but not blister. Place the Jalapenos into a ziploc bag and allow to cool. Once cool, remove the skins of the jalapenos and place the jalapenos back into the ziploc bag and place in the refrigerator. Next, dice your shrimp into small pieces. To make this task easier: place shrimp in a freezer bag in the freezer for 20 minutes. This will make the shrimp a bit firmer to dice. Once diced, brown in non stick pan with cumin, paprika and onion powder. In a medium bowl, place warm shrimp mixture with cream cheese and Parmesan. Gently fold to combine all of the mixture with the cheeses. Cover with plastic wrap and place in refrigerator.

Day of! Game Day!

Take Jalapenos and make a small slit going lengthwise. Do not remove the seeds if you would like to keep some of the spicy flavor. Gently, using a small spoon; put the filling into each jalapeno. Next, fire up the broiler! Place each popper on a pan sheet and roast on the lowest rack from the direct heat. Watch the poppers carefully. They’re perfect once they have reached a golden brown color on top.  Now dive in!!

Shrimp & cheese poppers


Cake Batter Doughnuts

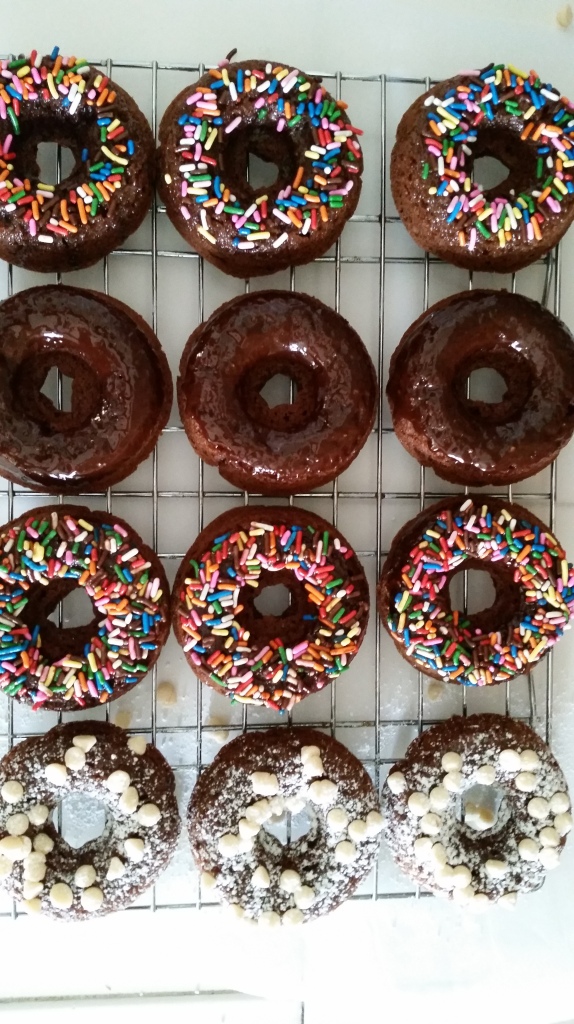
Around here weekends call for doughnuts. While I love supporting my local bakeries; there are times when a quick batch of doughnuts are necessary. Say when it’s freezing cold out, you live 20 miles from the nearest bakery, you’re tired, you simply don’t want to leave your house… The reasons why you need doughnuts at home are plenty and varied. Well, I’m here to show you how to have doughnuts in no time! Plus, you can freeze these treats to pull out on another day; when doughnuts are a must!

Cake Batter DoughnutsFirst off let’s talk cake batter. This is really a personal preference. Truly the more basic flavors work best for adding toppings: chocolate, white cake, yellow cake and spice cake. However, I think a carrot cake batter with a coconut topping would be equally delicious!

Now that you have selected your cake batter flavor let’s move on to making the doughnuts themselves. The process starts with a basic non-stick doughnut pan, yielding 6 doughnuts per pan. You will need to lightly grease the pan and preheat your oven to the temperature indicted on your cake batter box.

Next, using your cake batter box which should be a 15.25 oz box: pour into a large bowl half of the boxed cake batter and the following ingredients.

Ingredients: 

1/2 a box of cake batter

1/2 C. Water

1/4 C. Vegetable oil

1 egg whole

1 egg white

Bake until the doughnuts are firm but still have a slight spring to the touch.

Cake Batter Doughnuts

Once the doughnuts have cooled; it’s time to add the toppings.

A simple dusting of powder sugar is one option but let your imagination and taste buds guide you to the doughnut you fancy.

Note: if you intend to freeze the doughnuts do not glaze or add any toppings to the doughnuts.This recipe will yield roughly 10-12 doughnuts with half a box of cake batter.

Chocolate Ganache topping

Using semi sweet chocolate baking chips and a dash of dark chocolate; will yield the most wonderful ganache for topping your doughnuts. Create a double broiler (medium bowl over boiling water), Add chocolate and butter and whisk until smooth.

Dip your doughnuts in the chocolate and then place on parchment paper to dry. At this point in the process, you may add sprinkles to your doughnuts, chopped hazelnuts or any of your favorite toppings. Enjoy!


Cinnamon Roll Muffins

On their own these two components are great! Together: muffins+cinnamon rolls= heavenly deliciousness!!! Just look at these beauties; hot out of the oven…

Cinnamon roll muffins

I’m getting ahead of myself… First off, these are super simple to make. You’re basically using a boxed cake mix of your choice and a tube of cinnamon rolls. You can dress up your muffin mixture by adding shaved carrots and raisins to make these shall we say, “kinda healthy”? But for now, we will just keep things easy and make the recipe as is.

Cinnamon roll muffins Ingredients:

1/2 box of a 15.25 oz cake mix

12.4 oz tube of cinnamon rolls with icing

1 egg

1/4 cup vegetable oil

2/3 cup water

8 foil wrappers for muffin tin

Muffin tin


Directions:

Pre-heat oven to 350 degrees. Place muffin wrappers in muffin tin. In a medium bowl beat together all ingredients except the cinnamon rolls and icing. (If adding raisins or carrot shreds; gently fold them in at this time. ) Divide this batter evenly between the 8 muffin wrappers. Place in oven and bake for 8 minutes.

Next remove cinnamon rolls from tube and set aside icing. Take muffins out of the oven and place one cinnamon roll on top of each muffin. Place back in the oven and cook for an additional 12 minutes. Once golden brown, remove from oven and place on wire rack to cool. Using a fork drizzle the icing over the cinnamon roll muffins. Now, tell yourself: “I will only eat one of these with my coffee (tea)”. When no one is looking… Have another one. Your secret is safe with me!

Cinnamon roll muffins

Chicken Pot Pie

There’s nothing more comforting than a hot chicken pot pie in fall and winter. Chicken pot pie has become synonymous with images of fall foliage and winter days. These treasures truly are a labor of love when made from all scratch ingredients. Here’s a secret: These can be made in under 45 minutes. With a few little helpers along the way (i.e. pre-prepared ingredients) you can make your own pot pies and save time in the process. Ready to cozy up to your own pot pie? Here’s what you will need:

Ingredients: 

Small disposable pot pie tins (4)

2 frozen pie crusts (de-thawed)

1/2 lb diced or shredded chicken

1 medium egg

2 cups frozen mixed vegetables

2 Tb. fresh thyme

2 Tb. fresh sage

1 can of condensed mushroom soup

1/2 cup of half n half cream

Chicken pot pie

Directions:

Preheat your oven to 350 degrees. Lightly grease your pot pan pies and set aside on a cookie sheet. On a lightly dusted surface with flour, roll out your pie crust and using a knife cut out rounds 1/2″ larger than your pot pie pans. You may need to roll out your dough scraps to obtain a total of 8 rounds for your 4 pot pie pans. Gently press 1 round into the bottom of the pot pie tins. Next…

Using a large bowl, add all of your remaining ingredients. Gently stir and then divide the mixture evenly between the 4 pot pie tins. Now gently lay your pie crust round on top of the mixture and crimp the edges. Using a sharp knife cut a few vents on the tops. For a shiny, beautiful crust: simply brush on an egg wash. (1 beaten egg with 2 Tb water).

Chicken pot pie

Now for the hard part! You must wait for 30 to 35 minutes (or until golden brown and bubbly) for your pot pies. Your kitchen will be smelling amazing. Resist the urge to, “peek in” on your pies. This is a good time to make room in your freezer because guess what? When wrapped in double foil; these pot pies store nicely in the freezer. Enjoy!


Under 10 minutes- Pork!

Who doesn’t love a meal that’s quick and satisfying. This pork and sesame green beans will fill you up quick, without weighing you down. With just a few simple ingredients; dinner will be on the table in less than 10 minutes.

Chili pork tenderloin with garlic sesame green beans

Ingredients: 

1/4 lb. pork tenderloin cut into 1/2″ strips

1/2 lb. green beans, trimmed

1/2 tsp. chili oil

1/2 tsp. sesame oil

1 Tbsp. sesame seeds

2 Tbsp. Hoisen sauce

2 Tbsp. Water


Directions: 

In a large pot of boiling water, blanch your green beans and dry them. Place in a large bowl and drizzle chili oil over the beans. Toss the green beans to coat. Then sprinkle the sesame seeds on the green beans.

In a frying pan add the sesame oil and cook the pork strips for approximately 3 to 4 minutes. Turn off the heat, add the Hoisen sauce and water. Toss to coat.

Plate the pork and green beans and enjoy!

Pizza! It’s what’s for breakfast!

Don’t think pizza can make a healthy breakfast? Well this flavorful pizza is loaded with good for you toppings. Go ahead, indulge and have a slice or two. Pizza: your new breakfast treat!

Breakfast pizza

Using 1 whole wheat pita or white pita bread: toast until lightly golden. Mix together 2 tablespoons of vanilla greek yogurt to 1 teaspoon lemon curd. Spread on top. Sprinkle a tablespoon of blue cheese. Add arugula, raspberries and a drizzle of balsamic.  Simple! Delicious! Pizza!

Breakfast pizza

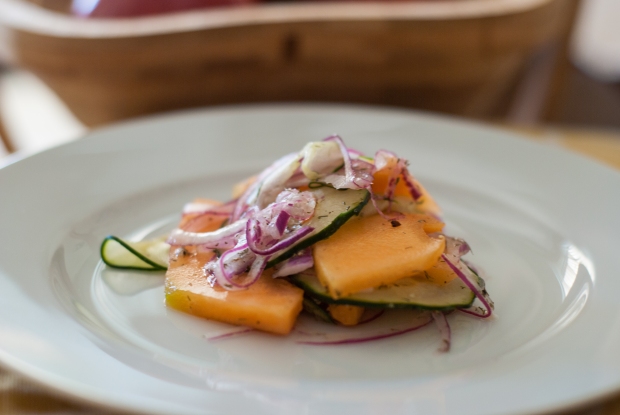
Cantaloupe and Cucumber Salad

It’s summer and its hot! The oven may be the last thing you want to turn on. So what can you make that’s cool, refreshing, healthy and ready in a snap? Easy: Cantaloupe and Cucumber salad!

Ready in minutes and can hold for a couple of days in your refrigerator. This salad is perfect for picnics and pool parties. Plus, you can easily transition this salad into a fancy brunch dish with the addition of lox and bagels.

Cantaloupe salad

Cantaloupe and Cucumber Salad

Ingredients: 

1 medium ripe cantaloupe

1 medium English cucumber

1 small red onion

1 Tbsp Dill dried (1/2 Tbsp if fresh)

1 Tbsp White rice wine vinegar

2 Tbsp Clover Honey

Preparation: 

Thinly slice your cantaloupe into 1/4″ slices. Using a mandoline, shave thin slices of cucumber and the red onion. Toss the cucumber, cantaloupe, onion and remaining ingredients in a bowl and cover with plastic wrap. Place in refrigerator for 30 minutes then serve.